Welcome to my blog.

After a few random posts I've decided to dedicate this blog to my life long project of Japanese food
and culture (and my life in general, especially my travels).

Since my first taste of sushi back in 1997 I've been interested in, and frequently been making
Japanese food.
My interest in the country and culture started long before and continues to evolve.
I was lucky to finally visit Japan in October 2008, again in November 2019 and hope to be back soon.
In July 2012 I visited Japantown in San Fransisco, the next best thing!
I was lucky to be back in 2015, 2016, 2017 and 2019 thanks to the fact that we now have family living in California.
Both small and big adventures will from now on, as time permits, be shared with you.

I will post other recipes and pictures too, mainly cooking projects, plants and art projects
(including my new love - making kumihimo braided objects).

I hope you'll find it interesting, and feel free to leave a comment or ask questions!

I write mainly in English, but there will be some Norwegian too, especially posts about things
that mainly have Norwegian interest. Tutorials are bi-lingual.

Friday 29 January 2010

Daughters bento


My daughter gets her bento too! Now in a spanking new Totoro box with egg made in Hello Kitty eggshaper and Hello Kitty small bottle with drinking yoghurt! Sandwich flowers and petals.

Monday 25 January 2010

Okara - cereal

So, what to do with all that okara? I turned mine into delicious cereal and muffins (recipe later), and then I froze down some. You'll get a lot of okara, so it's a shame to throw it all away.

I mixed 3 cups of okara with:
1 cup of rolled/cooked oats
1/2 cup of raisins
1 cup of shredded coconut
1/2-1 cup of agave syrup
1/2 cup of coconut oil

Mix well and spread on a greased baking sheet, maximum 1 inch deep. Dry it in the oven on about 150 degrees for a couple of hours. Store in a container, in the frigde to keep it longer. Eat it with milk or youghurt as breakfast.

Monday 18 January 2010

Homemade soy milk and tofu - step by step, part 2

My first tofu.

So, after making your own soy milk from beans, you're left with about 2 liters of fresh soy milk.
It's time to turn it into tofu!
(The tofu you make at home will come out as "cotton", not "silken", just for the record.)

First, you need a box or special tofu form to press the tofu in. I made my own out of a plastic box with some holes pinched, and the lid cut a bit smaller to fit inside the box with a weight on top. Line it with a cheese cloth or similar piece of loose-woven fabric, damp from being rinsed in cold water.Heat the soy milk up until about 80-90 degrees, hot, but not boiling. Use a thermometer if you have one. Switch off the heat and add your coagulant of choice, stir a couple of times and wait. You might have to add some more, but the less, the better.

I used apple cider vinegar because I couldn't get hold of nigari or gypsum. I added about 2 tbsp to 2 liters of soy milk.
When you see the whey and the solids separate into small curds, put the lid on the kettle and wait 10-15 minutes.
Take the lid off and check the state of things. If the curds are quite large and separated from the whey, you're all good. If they're small and still kinda integrated, add a bit more coagulant and put the lid back on. If you're happy, try to get most of the whey out before scooping the curds into your tofu form. Use a sieve and a large spoon.
Spoon the curds into your form lined with sieve cloth. Your final tofu block will be about half the size of the initial mixture. You might want to pour some in, wait for it to drain some, and then add more. When all is in, wrap the cloth over the top, put the lid on and weigh it down with a can or something else heavy. Place it in a bowl or in the sink so the liquid that comes out is collected. Leave for 20 min - 1 hour depending on how hard you like the tofu.
I drained mine for about 30-40 minutes.
Carefully slide your tofu out of the form and into a bowl of cold water. Remove the sieve cloth. Take the tofu out of the water and dry it with some kitchen paper. Enjoy!
It keeps 2-3 days in the fridge if you store it in a box with water.

Sunday 17 January 2010

My bento stash


Since I've ordered some more bento stuff, I decided to check what I've got now... before it arrives. And it is some, but I sure could use more! So, it's all good! Can't wait to get the egg shaper, small bottles and Totoro bento box!

From left: Furoshiki x2, drawstring bag, rabbit 2 tier box, Hello Kitty single box, ongri box x2, bento onigri box, 2 tier bentobox with shut-close lid, small boxes inkl. Hello Kitty mayo box with spoon, silicone shapes, training chopsticks for my daughter, vegetable cutters in various shapes, animal pins for food, nori stapler.

My bento equipment has been bought at Tokyo Hands in Tokyo and from J-box online. Plus a few household items from Norway like silicone molds, heart cutters, etc.

ps. most of this is my daughters! If you were wondering....

Saturday 16 January 2010

Bacon tofu!

Turkey wrapped tofu with soya sauce!


Yes, we got tofu, and now we must eat it! (Part 2 of tofu making is coming soon....)

And what better way to eat this all vegetarian treat than to wrap it in.... bacon? You got to love Japan!
Anyway, as I didn't have any bacon I decided to make turkey wrapped tofu instead...

You do it like this:
Put a block of tofu in kitchen paper, put a weight (plate) on top and drain it for about 30 minutes. Cut the tofu into bite size pieces.

Cut bacon or turkey into pieces that match the tofu pieces and wrap them. Fry in a pan until crisp.
For a traditional sauce put some soya in the pan with 2 tbsp of brown sugar and cook until a thick sauce. Add the tofu pieces. Eat with rice and vegetables. Or put it in your bento box.


Yum!

Homemade soya milk and tofu - step by step, part 1

First of all, thanks to one of my favorite bloggers at http://www.justhungry.com/ I got the overview on tofu making. I couldn't get hold of nigari or gypsum, so after further research I decided to try Apple cider vinegar as a coagulant. And it worked just fine! I'm working on getting hold of nigari though.

If anyone knows a store that ships nigari to Norway, please leave a comment!

So here's how I did it:

First I made soya milk. This is step 1:

I bought soya beans and soaked them aprox. 20 hrs. I could've soaked them less, but I had to go to work! I used 500 grams of dried beans.


This is how dry and soaked soya beans look like (I actually didn't know!):


The soaked beans goes in a food processor with enough cold water to just cover them. Depending on your food processor (I got a very small one) you might have to do this in batches. Pulse on full spead for 2-3 minutes untill you get a foamy white mass. Put this into a large pan.


When all the beans have been processed, measure the amount of soya mass and fill the same quantity of water in the pan.
My bag of 500 grams dry soya beans gave me about 2.5 liters of mashed soya foam...


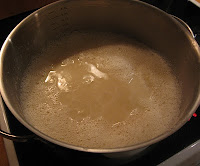
Put it on the heat and let it boil. At this point it'll probably start foaming a lot. If the foam reaches the edge of your pan - pour some cold water on it and stir. Or take it off the heat a bit. After a while the foam will subside and your soya beans + water should be left to simmer for aprox. 20 minutes. Stir it now and then.


The soya grain (okara) will separate from the milk and all that is left now is to strain the liquid. Pour it through a sieve cloth and squeese it with a big ladle or your hands (it's hot!).


Voila: soya milk! Use this as you normaly would use soya milk, it keeps for 2-3 days in the fridge. Or make tofu.... see part 2! Picture shows the fresh soya milk and the okara that was left after sieving.

Don't throw away the okara! It's great stuff, full of nuticious value, so keep it for baking etc. Recipes coming... Dry it in the oven on low heat or freeze it for later use. It keeps fresh in the fridge for a couple of days.

Tuesday 12 January 2010

Homemade tofu


Well, homemade tofu is on it's way. I've put soya beans in water to soak tonight, and tomorrow I'll complete the making of soya milk... then I'm just one mold and the right coagulant away from tofu!

Stay tuned - to be updated!

The recipe:
500 gram of dried soya beans - soak in water overnight, rinse, soak again (max. 24 hrs)

16 cups of water

1 teaspoon nigari or other coagulant, like vinegar, lemon, gypsum.... working on this

Cheese cloth
Tofu mold (square mold with weight on top)

........ fingers crossed!

14.01.10:
Yes! It's done... more pictures and instructions coming!