Kumihimo firkantfletting med 8 tråder
Kumihimo tutorial - square braid with 8 threads
Du trenger til et armbånd: 4 tråder i valgfri tykkelse ca. 75 cm lange, i en, to eller fire farger.
Instruksjonene viser 2 farger satt opp symmetrisk som gir et stripete mønster. Det er brukt satengtråd i tykkelsen 2+ mm, "rattail". Det gir et kompakt og forholdsvis stivt armbånd. Tykkelsen passet i 8 mm endestykker.
You´ll need for one bracelet: 4 threads in your chosen size, aprox. 75 cm (2,5 feet) long, in one, two or four colors. The instructions show a two color braid with symmetric positions that gives a striped pattern. I´ve used 2,2 mm satin cord, "rattail". It fits in 8 mm endcaps.
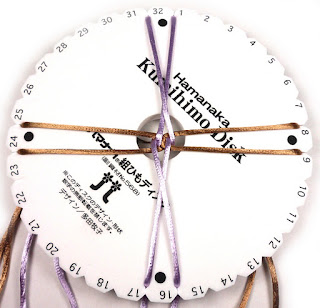
Sett opp trådene som til den vanlige 8 tråders runde flettingen. Ps: Bildet viser startposisjonen etter at det er flettet en runde. Når du starter fra begynnelsen vil ikke trådene oppe og nede være krysset som på bildet.
Set up your braid as you would for the basic 8-strand. (In start position the upper and lower threads won´t be crosses like in the picture, that happens after you braided one round.)
Startoppsett.
Start position.
Start position.
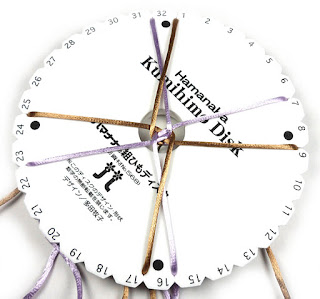
Flytt tråd fra 1 til 7 (øverste høyre tråd ut til høyre over de høyre trådene).
Move thread 1 to 7 (upper right thread down to the two threads to the right).
Move thread 1 to 7 (upper right thread down to the two threads to the right).
Flytt tråd fra 17 til 23 (nederste venstre tråd ut til venstre under de venstre trådene).
Move thread from 17 to 23 (lower left thread up to the two threads on the left).
Move thread from 17 to 23 (lower left thread up to the two threads on the left).
Flytt tråd fra 24 til 1 (midterste venstre tråd krysser over tråden på toppen).
Move thread from 24 to 1 (mid left thread crosses the thread on top).
Move thread from 24 to 1 (mid left thread crosses the thread on top).
Flytt tråd fra 8 til 17 (midterste høyre tråd krysser over tråden nederst).
Move thread from 8 to 17 (mid right thread crosses the thread down).
Move thread from 8 to 17 (mid right thread crosses the thread down).
Flytt tråd fra 32 til 26 (øverste venstre tråd ut til venstre øverst).
Move thread rom 32 to 26 (upper left thread out to left side).
Move thread rom 32 to 26 (upper left thread out to left side).
Flytt tråd fra 16 til 10 (nederste høyre tråd ut til høyre nederst).
Move thread from 16 to 10 (lower right thread out to right side).
Move thread from 16 to 10 (lower right thread out to right side).
Flytt tråd fra 9 til 32 (midterste høyre tråd krysser over tråden på toppen).
Move thread from 9 to 32 (mid right thread crosses over top thread).
Move thread from 9 to 32 (mid right thread crosses over top thread).
Flytt tråd fra 25 til 16 (midterste venstre tråd krysser over tråden nederst).
Move thread from 25 to 16 (mid left thread crosses over down thread).
Move thread from 25 to 16 (mid left thread crosses over down thread).
Juster trådene til høyre og venstre inn et hakk på hver side slik at du kommer tilbake til startposisjon (bare med omvendte farger).
Adjust threads on left and right side one notch down and up to reach start position.
Adjust threads on left and right side one notch down and up to reach start position.
Repeter til du har nok fletting til et armbånd eller det smykket du ønsker.
Repeat until the braid is long enough for a bracelet or other desired jewelry.
Resultatet!
Lykke til......
The result! Good luck....
The result! Good luck....


