For about 2 bracelets (finished length 30+ cm), I used 6 x 1,20 m lengths; 5 x 1 mm cords in dark blue satin and 1 x 2mm cord in pink satin. The thicker cord might be a bit shorter if you want. Lay the threads double and place the 12 threads in the starting position as shown under.
(I will refer to the disc as a clock: 12 o´clock is on top, 3 o´clock is to the right, 6 o´clock is bottom ans 9 o´clock is left.)

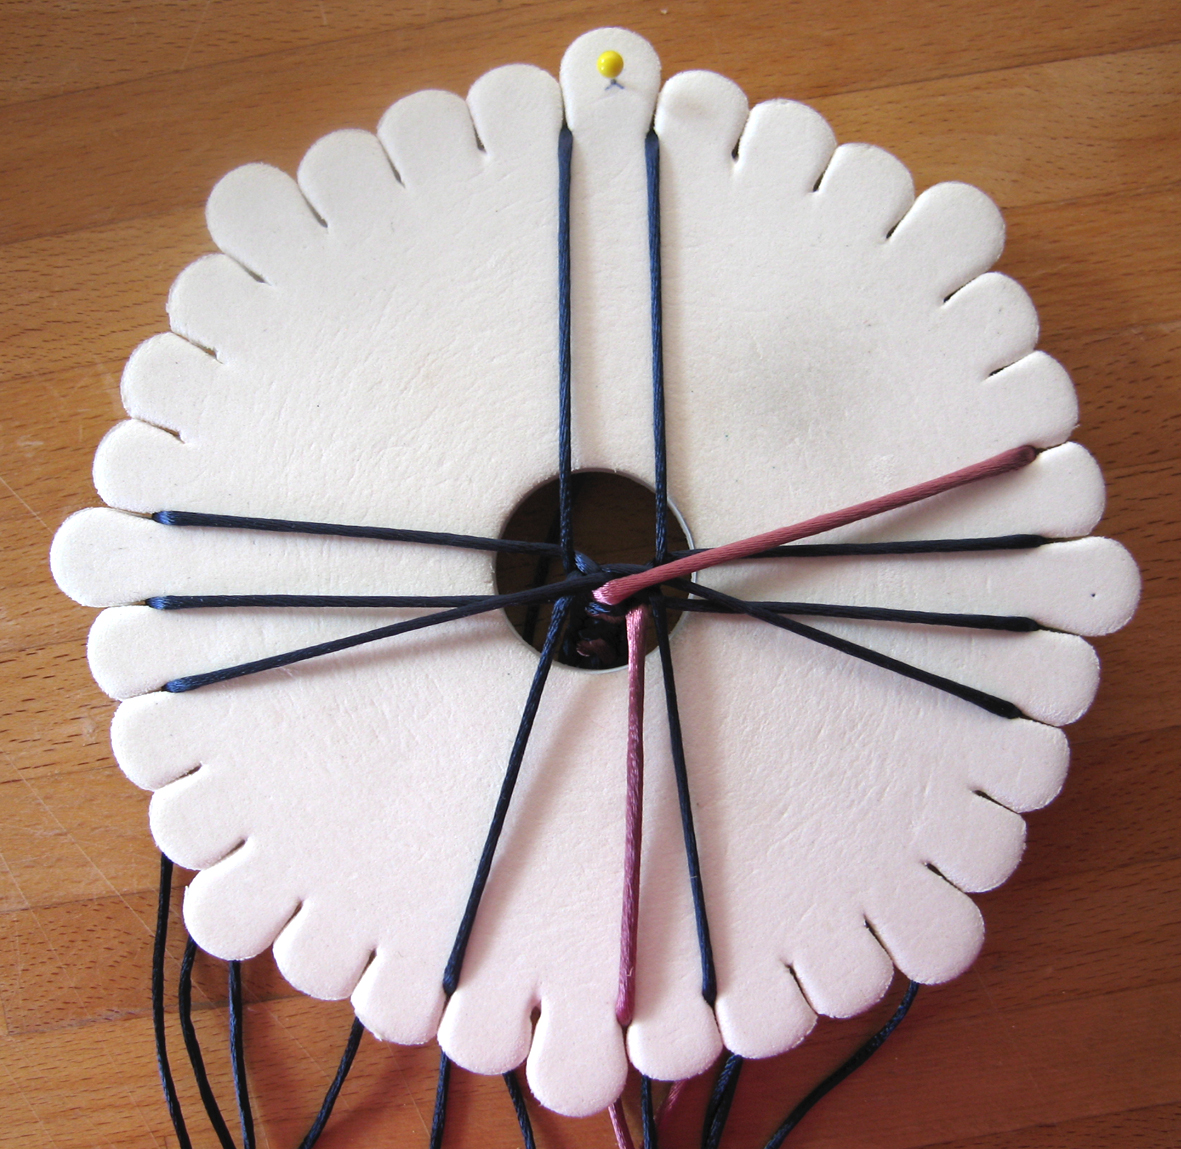
This is the starting position of the threads. I mark the top with a pin to keep track.

First take the inner right thread in the 12 o´clock position and move it down below the two threads on the left side, in the 9 o´clock position.

Take the inner left thread in the 12 o´clock position and move it down below the two threads on the right side, in the 3 o´clock position.

Move the two top threads closer, replacing the moved threads.
Now, take the inner left thread in the 6 o´clock position and move it up above the two threads on the right side, in the 3 o´clock position.

Do the same move with the inner right thread in the 6 o´clock position to the left side.

Move the two bottom threads closer, replacing the moved threads.
This completes the first sequence. You should have two threads top and bottom, and 4 threads left and right.

Take the top inner thread in the 9 o´clock position and move it down to the left side of the two bottom threads in the 6 o´clock position.

Take the lower inner thread in the 9 o´clock position and move it up to the left side of the two top threads in the 12 o´clock position.

Move the two remaining threads on the left side closer together, replacing the moved threads.

Now, it´s time to repeat with the right side. Take the upper right thread in the 3 o´clock position and move it down to the right side of the lower threads in the 6 o´clock position.

Take the lower right thread in the 3 o´clock position and move it up to the right side of the upper threads in the 12 o´clock position.

Move the two remaining threads on the right side closer together, replacing the moved threads.
This completes the whole sequence. You need to repeat the sequence 3 times to get the pink threads back in the starting position, creating 1 heart.

The braid in progress!

A while later.....
Good luck!
Ps: I would love to have the startup position (pattern) of the round 16-thread heart pattern. If anyone cares to share: Please leave a comment!
The 16-strand heart pattern can be found at www.homemade-gifts-made-easy.com. Just in case you can't find it the two color combo looks like this: background color strands 1, 2, 4, 5, 6, 7, 12, 13, 15, 16 and heart color for strands 3, 8, 9, 10, 11, 14. I hope this helps.
ReplyDeleteThank you so much Glendalynn, that helps a lot! I found another pattern, but it gave me more triangles, mot actual hearts. This one looks like the real thing. :)
ReplyDeleteThe spiral bracelets are beautiful! Are they hard? Do you sell your patterns? I love the pictures! Thanks!
ReplyDeleteHi there, My name is Laura, and I am the editor of AllFreeJewelryMaking.com, a free resource for jewelry tutorials. This is a great kumihimo tutorial, and we would love to feature tutorials like this and others like it on our site. If you are interested in having us feature this project, please submit it here: http://www.allfreejewelrymaking.com/index.php/hct/Submit-Pattern
ReplyDeleteWhere do I find a 'clock' templete? I would like to give this a try...thanks for posting
ReplyDeleteThis is completely different and new to me,and I am fairly long in the "tooth "!I so want to find an outlet to buy the template in the UK . THANK YOU. M.A.J
ReplyDelete